How to Save Money on HDB Renovations: 12 Budget-Smart Strategies

Young couple reviewing HDB renovation budget and floor plans at home with laptop and design materials
You've found your dream HDB flat. The layout works, the location is perfect, and the price is right. Then you get the renovation quote and suddenly your heart sinks. That $45,000 budget you set? The contractor is looking at $62,000. By the time you factor in appliances, furniture, and a 15% contingency buffer, you're staring at numbers that don't match your spreadsheet.
Here's the thing: HDB renovation costs in Singapore don't have to spiral out of control. The difference between homeowners who stay on budget and those who don't usually comes down to one thing—smart planning and knowing which corners you can safely cut (and which ones you absolutely shouldn't).
In this guide, you'll learn 12 practical, actionable strategies to save money on your HDB renovation without compromising on quality. From negotiating contractor rates to understanding which upgrades deliver the best value, these tactics are based on real Singapore HDB renovation experience. Whether you're renovating a 3-room HDB, a 4-room flat, or a larger unit, these cost-saving approaches work across all flat sizes.
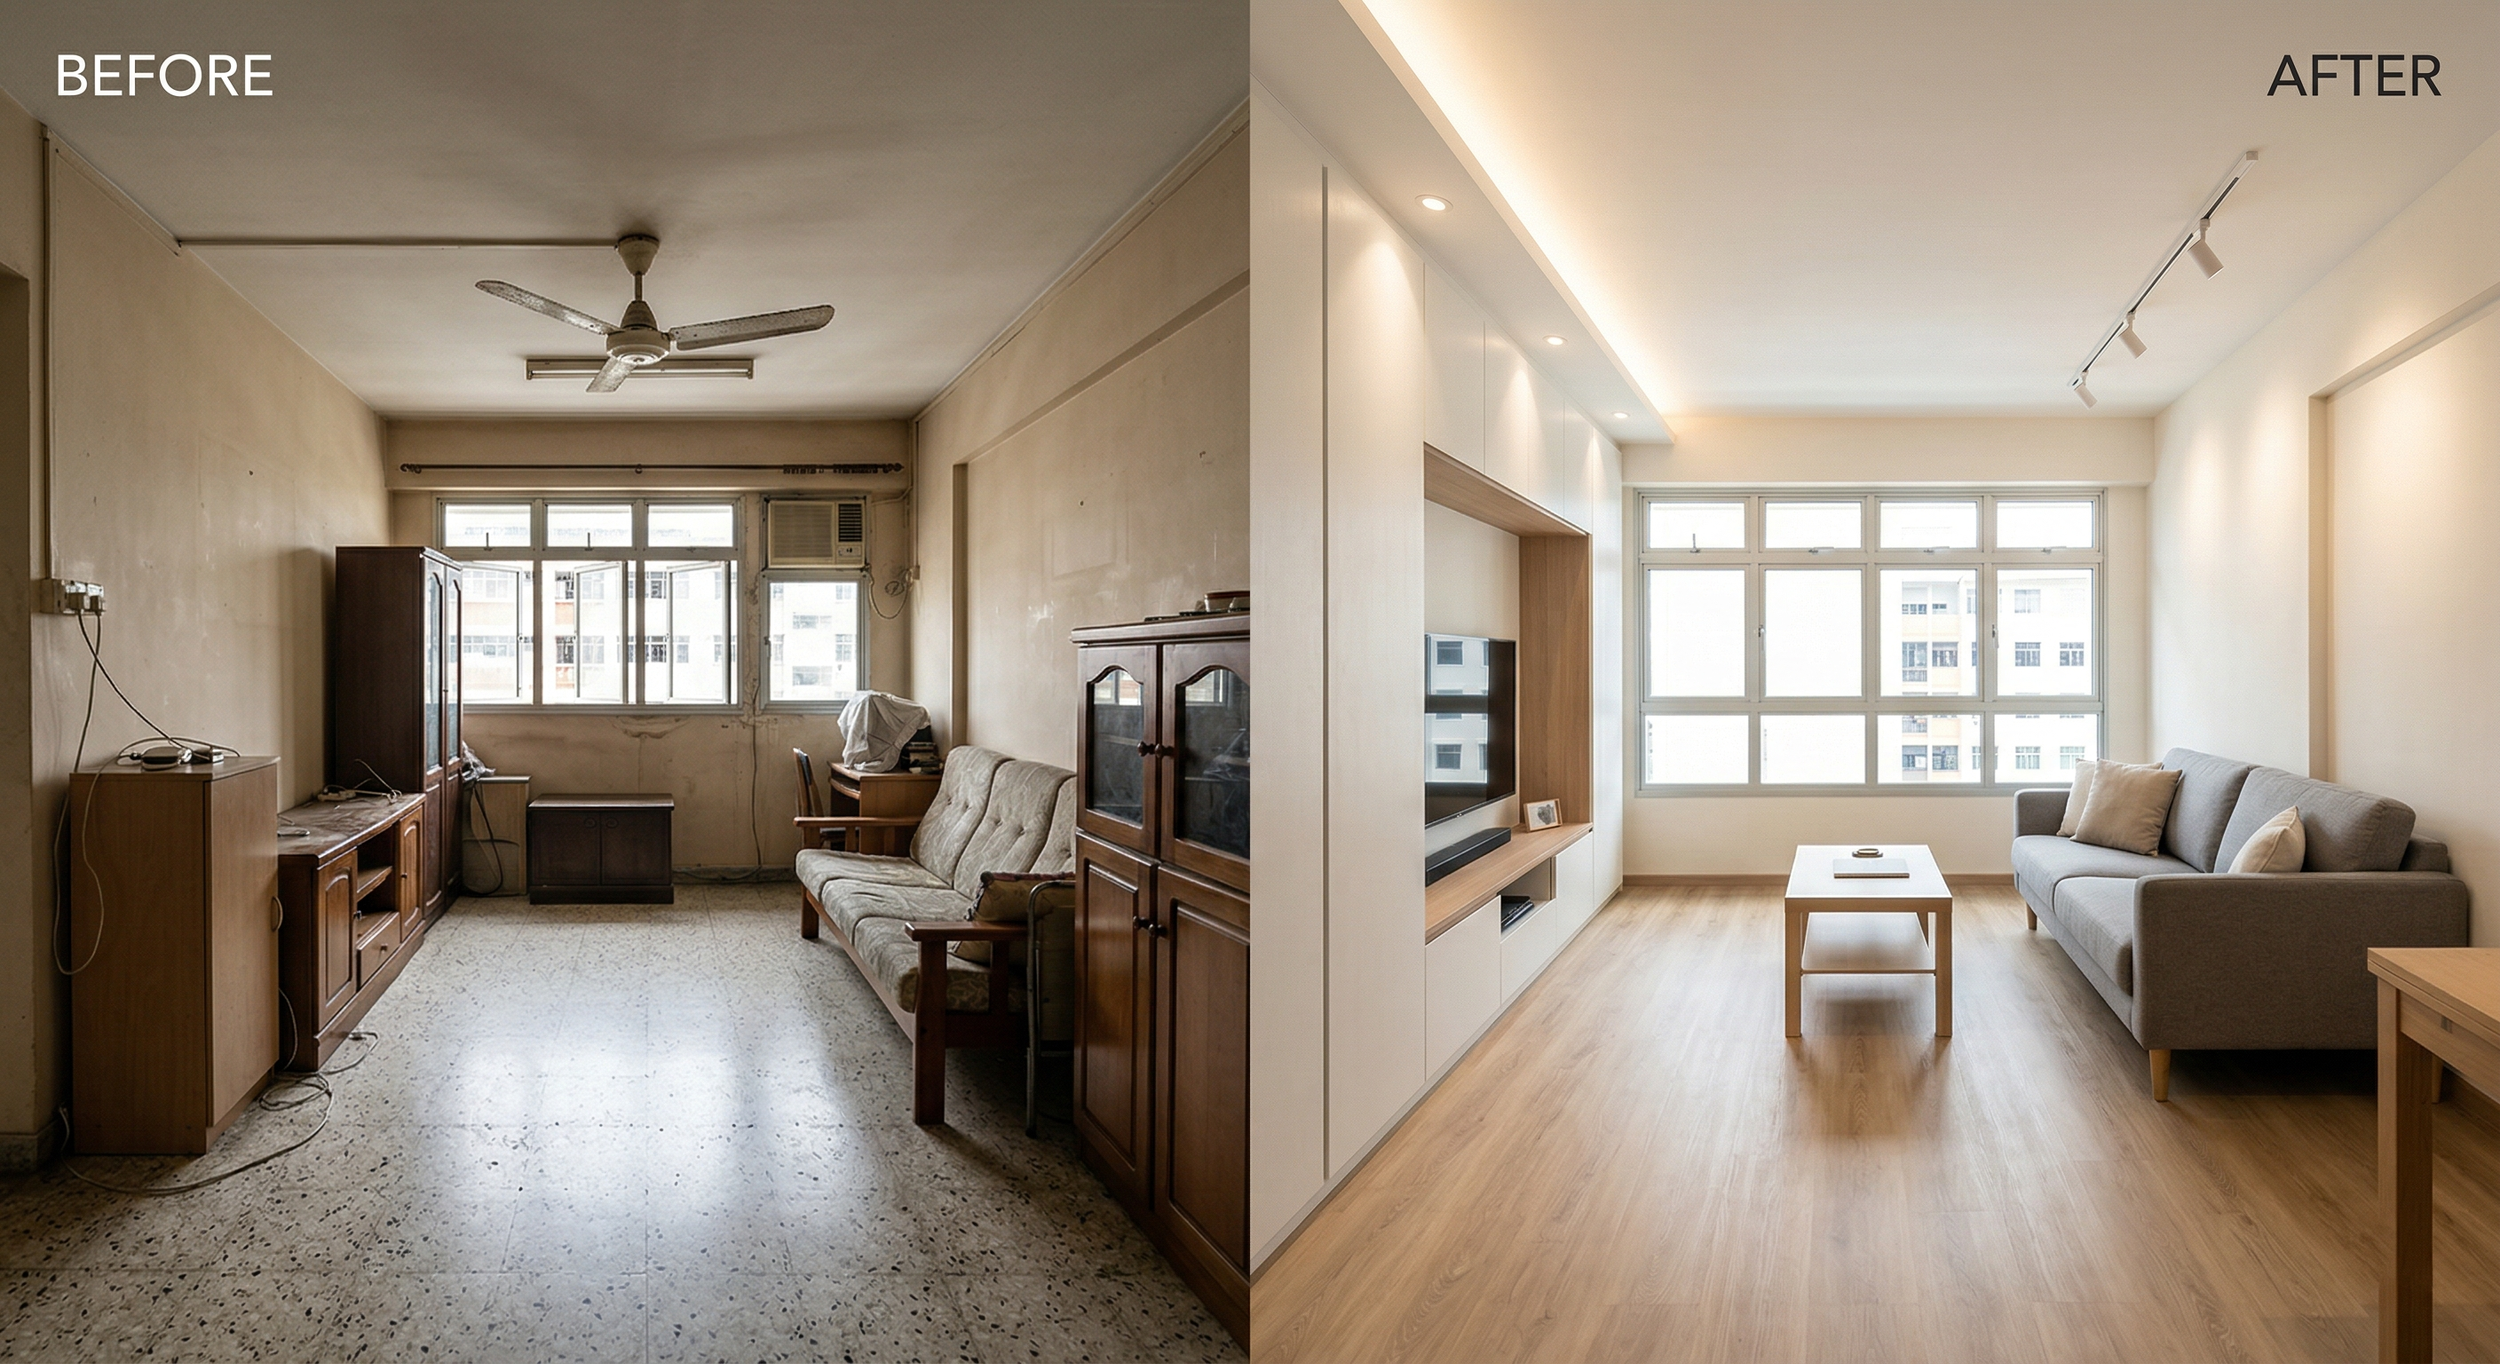
Before and after comparison of HDB renovation showing dated space transformed into modern, space-efficient design
Why HDB Renovation Costs Spiral (And How to Prevent It)
Before we dive into savings strategies, it's important to understand why HDB renovation costs tend to exceed initial estimates. Most homeowners budget for the construction work itself—hacking, tiling, carpentry, plumbing—but forget about the hidden expenses that add up fast.
Common cost overruns include:
Contingency costs (unexpected structural issues, additional hacking required)
Appliances and fixtures (extractor hood, sink, faucets, lighting)
Finishing touches (paint, adhesives, waterproofing materials)
Furniture and soft furnishings
Post-renovation cleaning and disposal of renovation waste
Permit fees and inspections
Temporary accommodation if renovation extends longer than expected
The reality is that construction always uncovers surprises. A wall that looks solid from the outside might have hidden water seepage. Hidden pipes or electrical conduits might require rerouting. These discoveries, while frustrating, are normal—and budgeting for them upfront is one of the smartest things you can do.
That's where a 10–15% contingency buffer becomes your financial safety net. If you budget $50,000 for renovation, set aside an additional $5,000–$7,500 for unexpected costs. If you don't need it, great—you've got money left over. If you do, you're not scrambling.
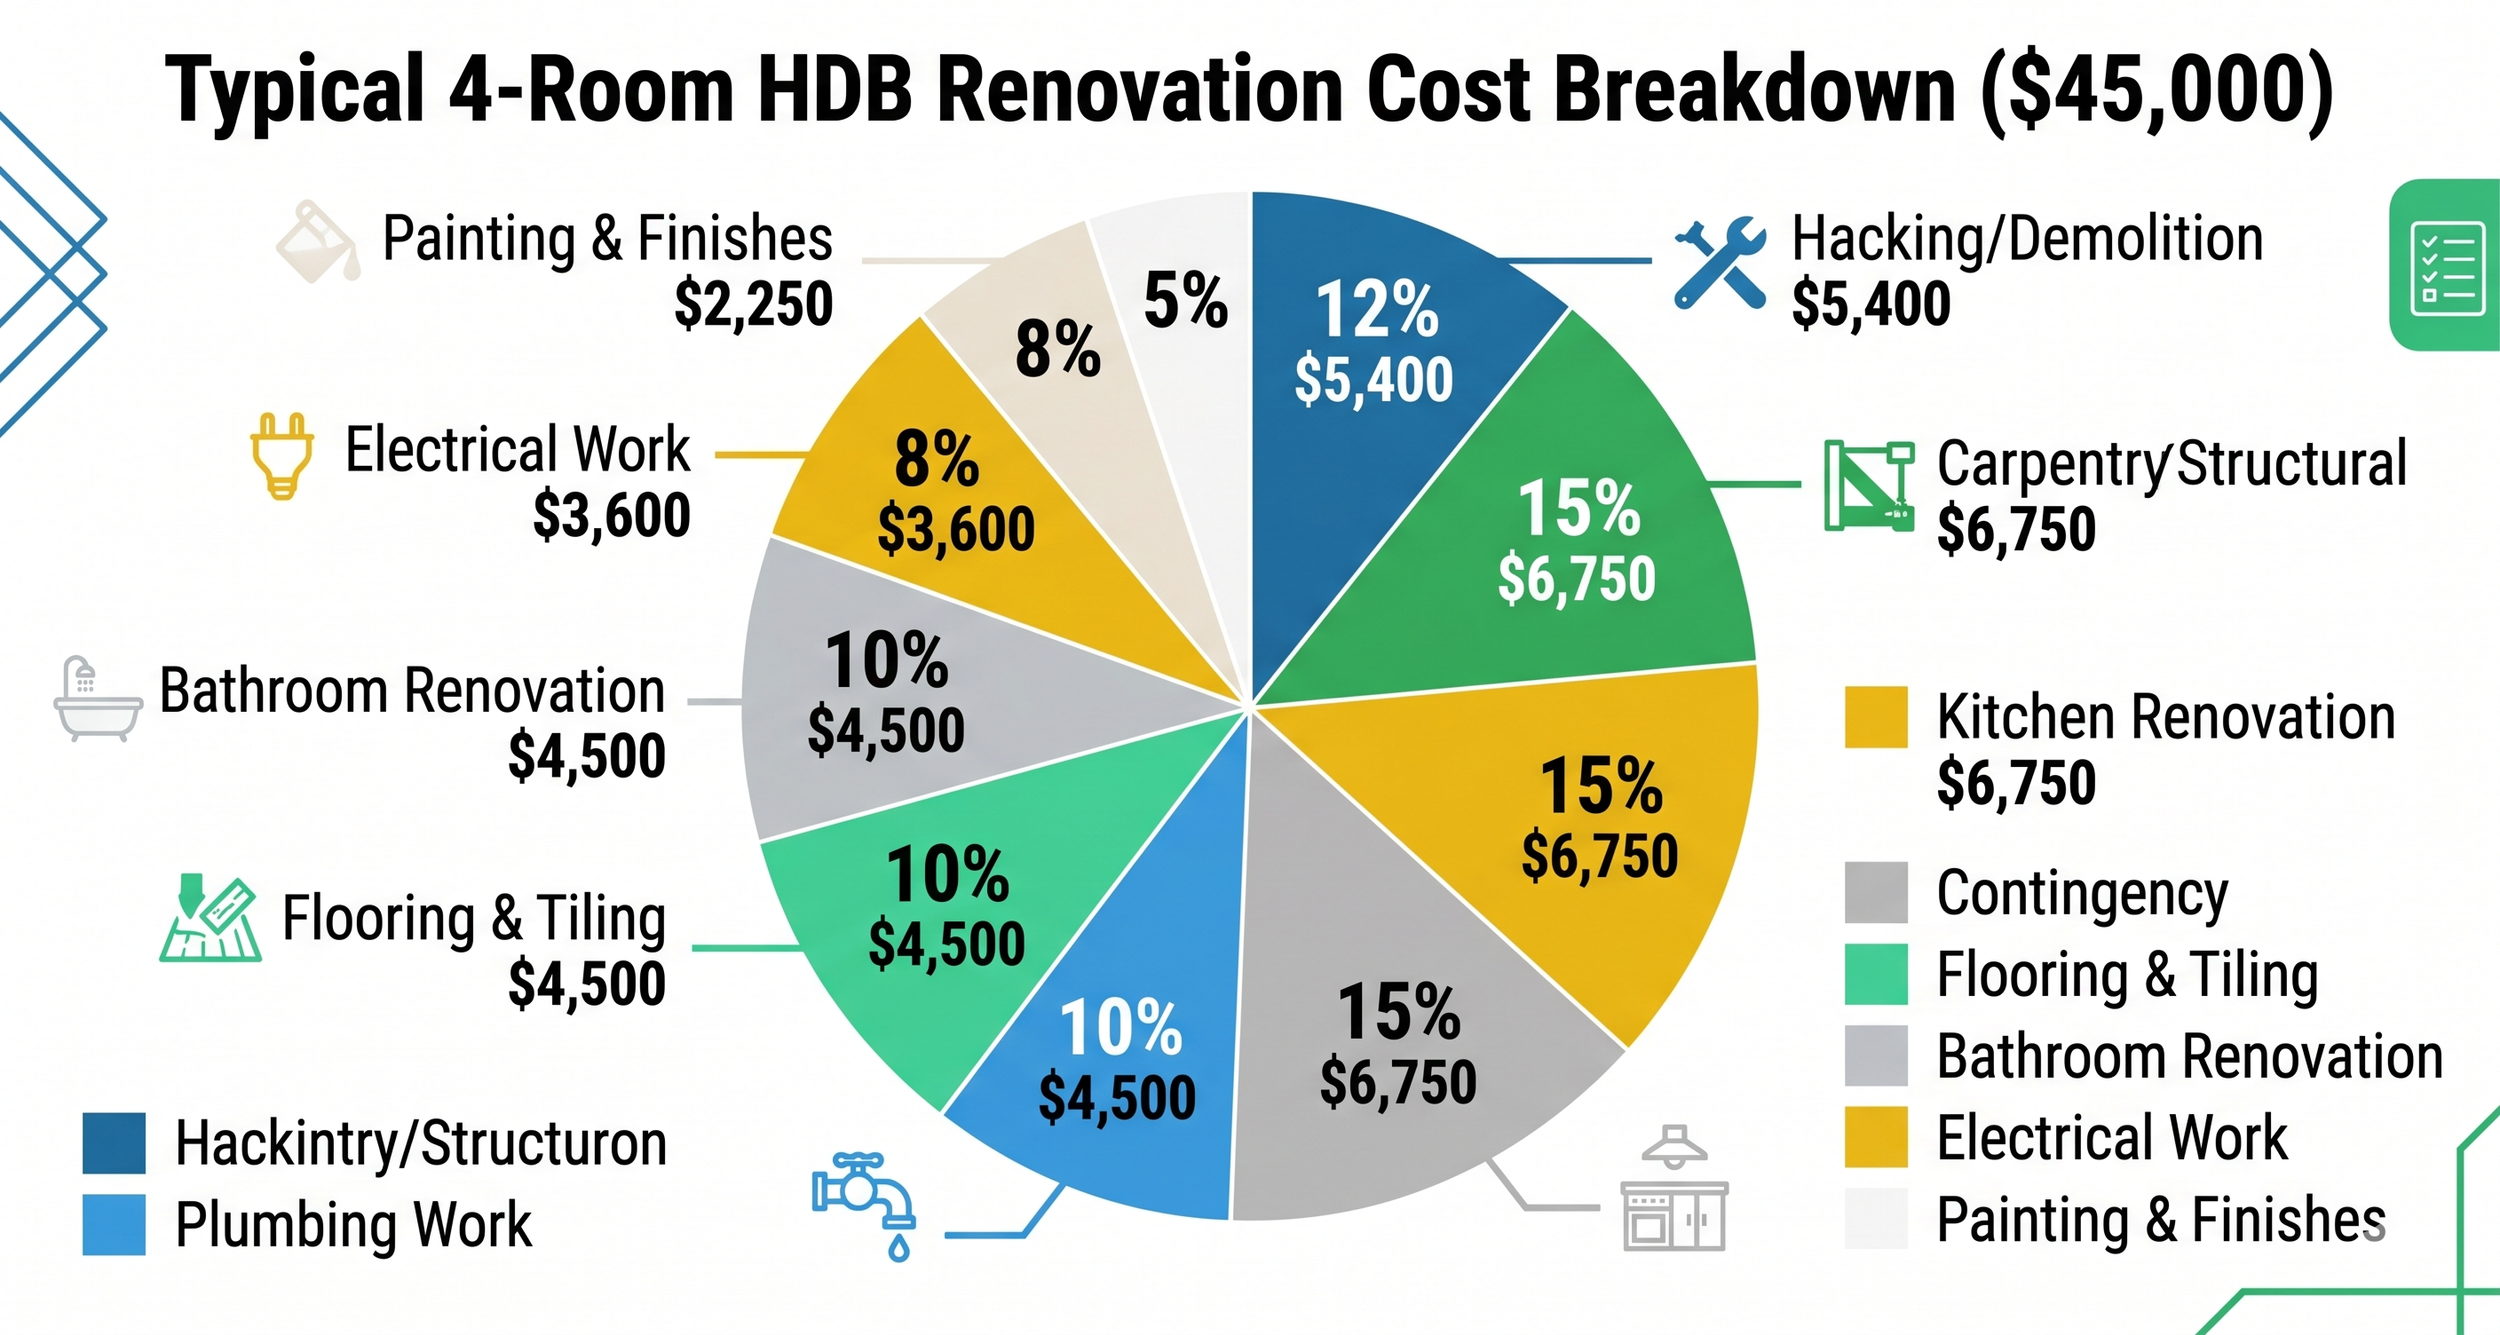
Pie chart showing breakdown of typical HDB renovation costs across construction, finishes, and contingency categories
Strategy #1: Prioritise High-Impact Upgrades
Not all renovation work has equal visual or functional impact. Some upgrades completely transform your space, while others are nice-to-have additions that don't justify their cost.
The highest-impact areas for HDB renovation are:
Kitchen — A refreshed kitchen dramatically changes how a flat feels. If your kitchen currently has dated cabinetry, worn countertops, or poor lighting, upgrading here delivers immediate returns. Budget 25–30% of your total renovation for the kitchen.
Bathroom — A modern, functional bathroom significantly improves daily life quality. If your current bathroom has water seepage issues, poor ventilation, or outdated fixtures, this is a priority.
Flooring — New flooring across living areas creates a cohesive, modern feel. However, you don't need to use premium materials everywhere. Consider using high-quality tiles in high-traffic areas and more affordable options in bedrooms.
Lighting — Good lighting is transformative and relatively affordable. Upgrading from basic ceiling lights to layered lighting (ambient, task, accent) costs far less than a kitchen renovation but makes a huge difference.
Paint and wall finishes — A fresh coat of paint and strategic wall treatments (like a feature wall or wallpaper accent) cost surprisingly little but refresh the entire space.
Areas you can safely defer or simplify:
Structural changes or open-concept conversions (expensive, complex)
Premium fixtures in low-visibility areas (like guest bathroom storage)
Oversized furniture or custom pieces (buy standard sizes, customise later)
Advanced smart home systems (add these after moving in if needed)
The math: Spending $15,000 on a kitchen facelift and $8,000 on bathroom upgrades might cost $23,000 total but transform 40% of your flat. Spending the same $23,000 on structural changes that only affect one room delivers far less impact.
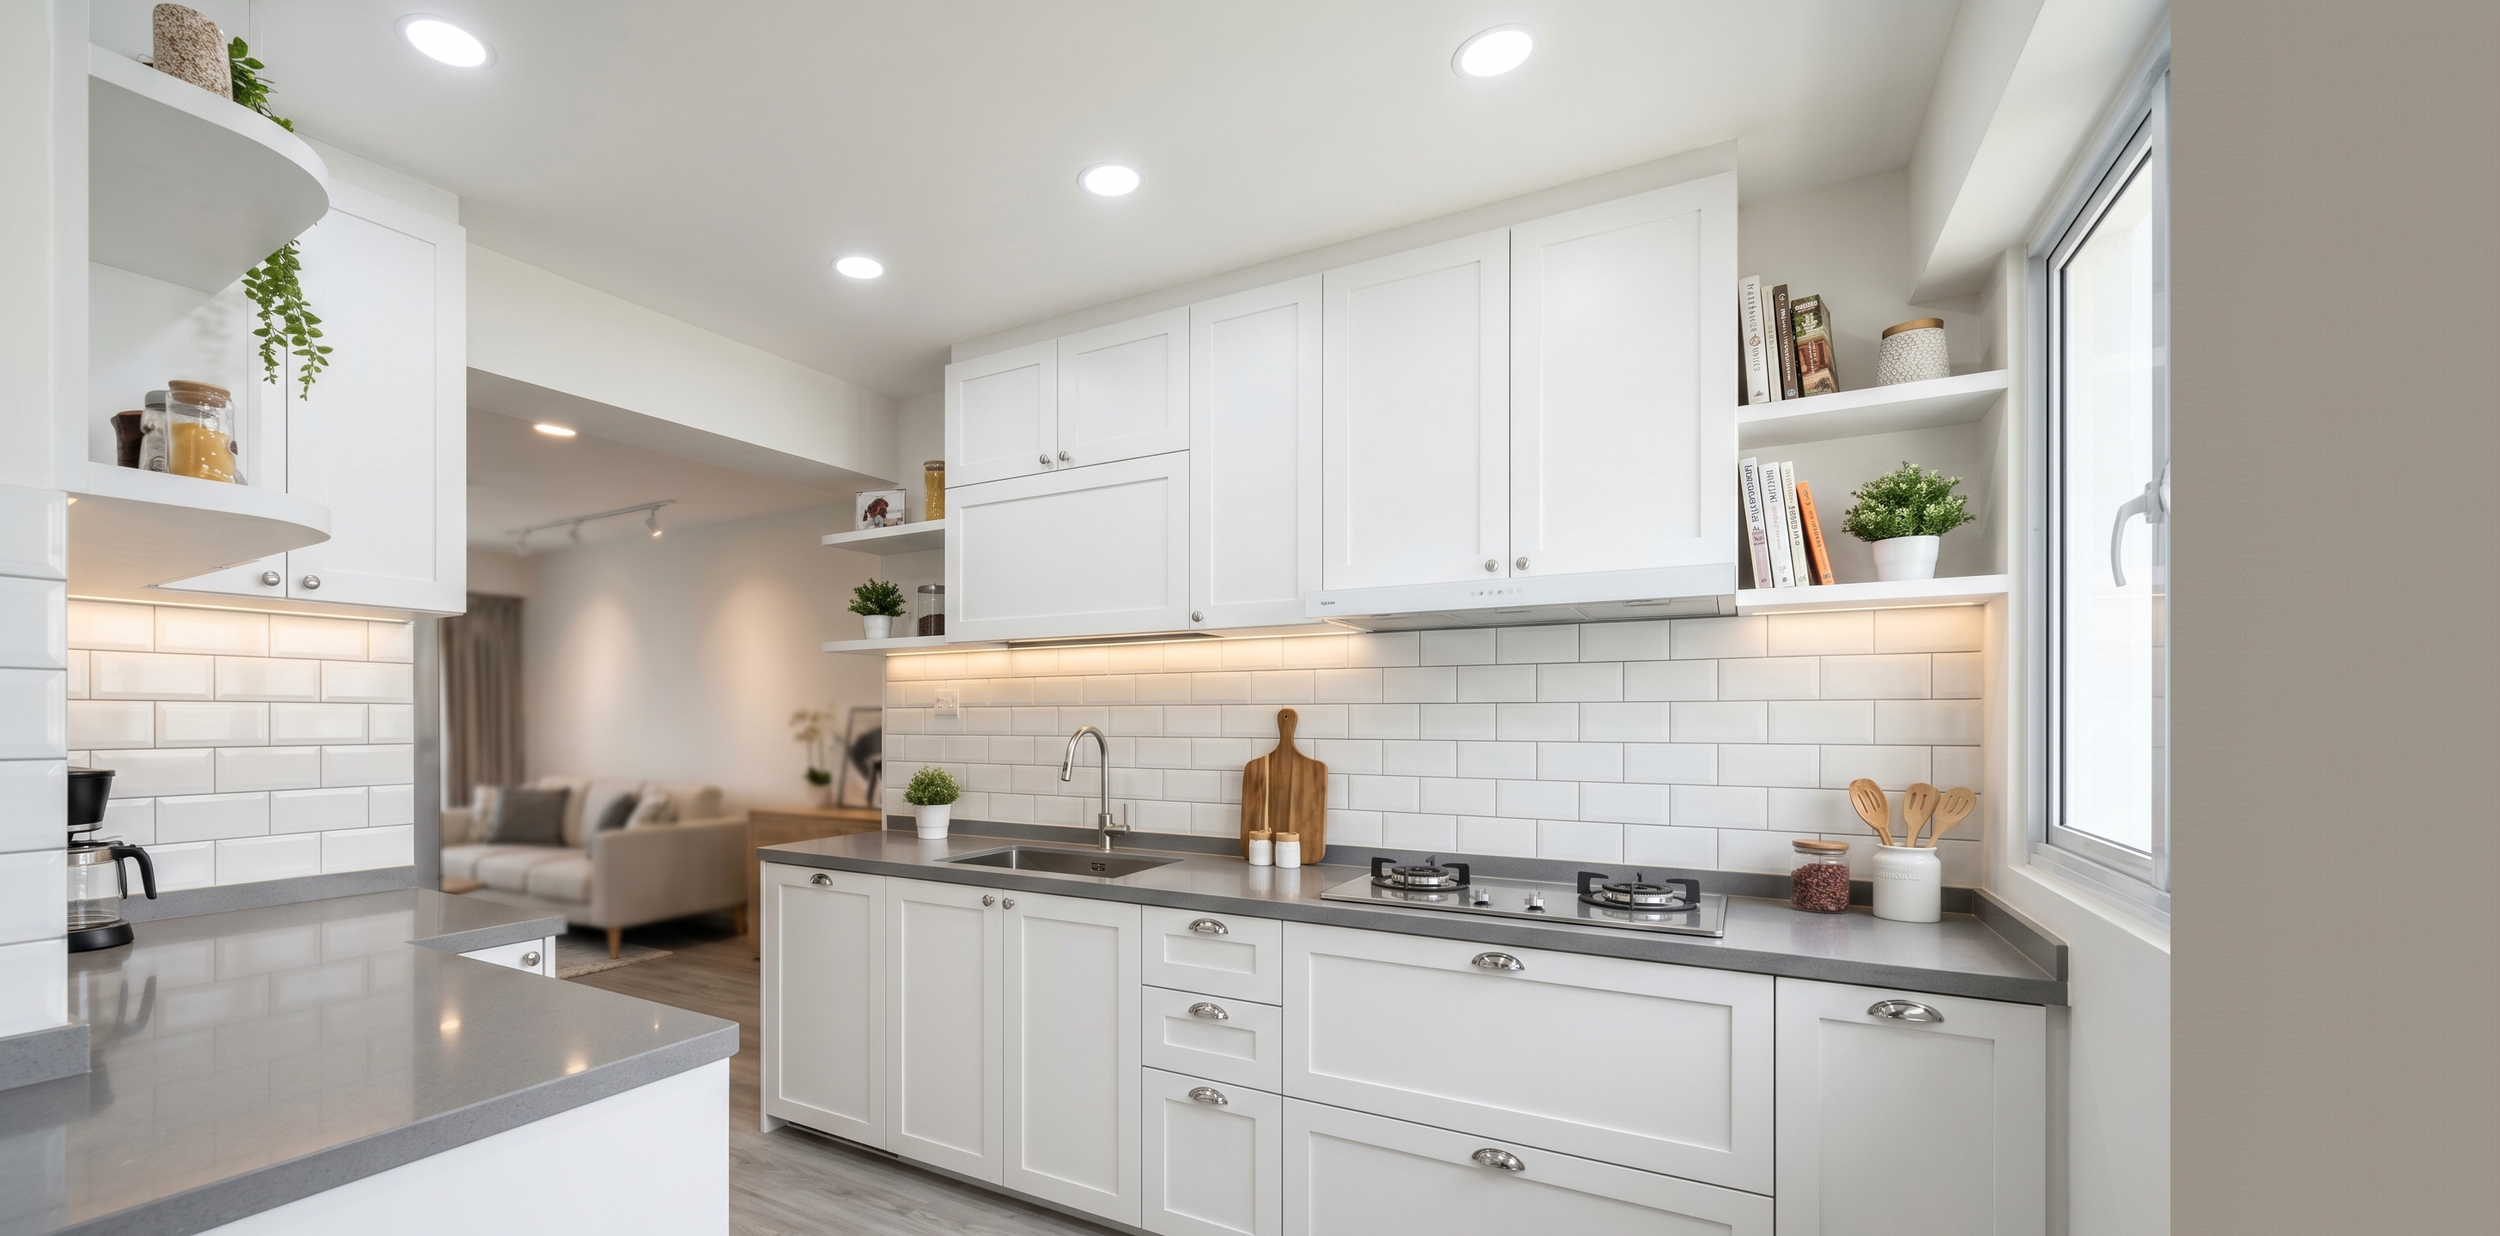
Modern Singapore HDB kitchen with clean white cabinetry, quartz countertop, stainless steel appliances, and bright LED lighting
Strategy #2: Negotiate Contractor Rates and Get Multiple Quotes
Your HDB renovation contractor is one of your biggest expenses. And like any service, the price isn't fixed—it's negotiable, especially if you're flexible on timeline or scope.
Getting quotes right:
Always get at least 3 quotes from HDB-licensed contractors. Use HDB's official RDOC (Renovation Contractors Directory) to verify they're properly licensed. Unlicensed contractors might quote lower but expose you to risks (poor work, no recourse, potential fines from HDB).
Be specific in your scope. Don't say "I want a kitchen renovation." Instead, provide:
Specific dimensions
Materials you're considering (tile type, countertop material, cabinet finishes)
3D drawings or floor plans
A list of specific work items (hacking, tiling, electrical, plumbing, carpentry)
Ask contractors to break down costs line-by-line. A contractor who gives a lump-sum quote of $50,000 is harder to negotiate with than one who shows you: hacking ($8,000), tiling ($12,000), electrical ($7,000), carpentry ($15,000), finishing ($8,000). You can then discuss reducing specific line items.
Negotiate strategically. Don't ask for a blanket discount. Instead, ask: "Can you adjust your timeline to off-peak season?" or "If I provide my own tiles, can you reduce the materials cost?" or "What's your rate if I extend the project by 2 weeks?"
Ask about package discounts. Contractors who handle multiple areas (kitchen + bathroom together) often offer better rates than managing separate specialists.
A realistic expectation: A good contractor will rarely drop their quote by more than 10–15% without cutting corners. If someone's quote is 30% lower than others, that's a red flag—they may be cutting quality or planning to upsell you later.
Strategy #3: Choose Materials Wisely—Premium Where It Matters
Not all materials are created equal, and neither is the cost-to-value ratio. The key is knowing where to invest in quality and where budget-friendly options work just fine.
Invest in quality for high-use items:
Kitchen countertops — You touch them daily. Quartz or laminate with good edge sealing lasts longer than budget laminates. Budget $80–150 per linear meter.
Bathroom tiles — Slips, moisture, and daily wear mean you want durable, non-porous tiles. Porcelain tiles ($15–40 per sqm) outlast cheaper ceramic in bathrooms.
Flooring in high-traffic areas — Living room, kitchen, hallway. Quality vinyl or laminate ($30–60 per sqm) resists scratches and stains better than budget options.
Taps and fixtures — You use these multiple times daily. A mid-range tap ($150–400) lasts longer than a budget tap ($50–80).
Where you can save without sacrifice:
Bedroom flooring — Lower-traffic areas can handle budget-friendly laminate or vinyl plank. Budget $20–35 per sqm.
Wall finishes in secondary rooms — Simple emulsion paint works fine; you don't need premium finishes everywhere.
Cabinet hardware — Choose simple, quality handles ($5–15 each) instead of specialty designer hardware ($20–50 each).
Bathroom secondary fixtures — Towel racks, mirrors, shelving can be budget-friendly and swapped out later.
Non-structural carpentry — Simple wardrobes with painted wood cost less than custom designer pieces and are easier to replace later.
The strategy: Identify the 5–6 items you'll interact with daily and invest well there. On everything else, choose functional budget options that you can upgrade later without ripping out walls.

Close-up comparison of premium quartz countertop versus budget laminate countertop showing durability and finish differences
Strategy #4: Do What You Can Yourself (Safely)
Not all renovation work requires a licensed contractor. Some tasks are perfect for DIY, while others absolutely should not be.
What you can DIY (safely and legally):
Painting — This is the classic DIY job. A fresh coat costs $2–5 per sqm if you do it yourself versus $8–15 per sqm if you hire someone. For a 100 sqm flat, that's $600–1,000 in savings.
Simple tile work — If you have basic skills and the area is small (feature wall, bathroom feature tiles), this is learnable.
Installing shelving, mirrors, and simple fixtures — Hanging non-structural items is straightforward.
Furniture assembly — IKEA wardrobes, shelving units, kitchen islands—many come flatpack and save labour costs.
Soft furnishings and decor — Sourcing and styling are 100% DIY if you're willing to spend time.
What NOT to DIY:
Any structural work (wall removal, hacking, ceiling modification)
Plumbing (requires licensed plumber, affects HDB approval)
Electrical work (requires licensed electrician, safety and regulatory requirement)
Waterproofing (needs expertise; poor work causes water seepage and neighbor disputes)
Load-bearing wall or major carpentry changes (needs structural approval)
The mindset: DIY is about trading your time for money. If you have 20 hours to spend painting, that's $600–1,000 saved. If you're paying yourself $30/hour mentally, it's worth it. If not, hire a professional.
Strategy #5: Phase Your Renovation
Not everything needs to happen at once. Phasing your HDB renovation is one of the smartest cost-management strategies, especially if your budget is tight.
Phase 1 (Essential): Weeks 1–6
Hacking and structural work
Plumbing and electrical rough-in
Waterproofing in wet areas
Basic carpentry (walls, doors, basic cabinetry)
Budget: 50–60% of total
This phase covers the structural work that's hardest and most disruptive to undo. You need this done right.
Phase 2 (Important): Weeks 7–10
Tiling and flooring
Kitchen and bathroom finishing (fixtures, hardware)
Painting
Lighting installation
Budget: 25–30% of total
By this stage, your flat is functional. You could theoretically move in after this phase.
Phase 3 (Enhancement): Months 3–6
Custom cabinetry or additional storage
Feature walls or accent treatments
Furniture and soft furnishings
Smart home features or advanced lighting
Budget: 10–15% of total
These are the finishing touches you can add over time as budget allows.
Why phasing saves money:
You spread costs across paychecks — Instead of a $50,000 lump sum, you budget $25,000 now and $15,000 three months later.
You live with decisions before committing — After Phase 2, you might realize you don't need the expensive feature wall you planned. Savings.
You can adjust based on actual vs. budgeted costs — If Phase 1 comes in under budget, you allocate extra funds to Phase 2. If it overruns, you know where to trim Phase 3.
Contractor availability — Spreading work across months sometimes lands you better contractor rates during off-peak periods.
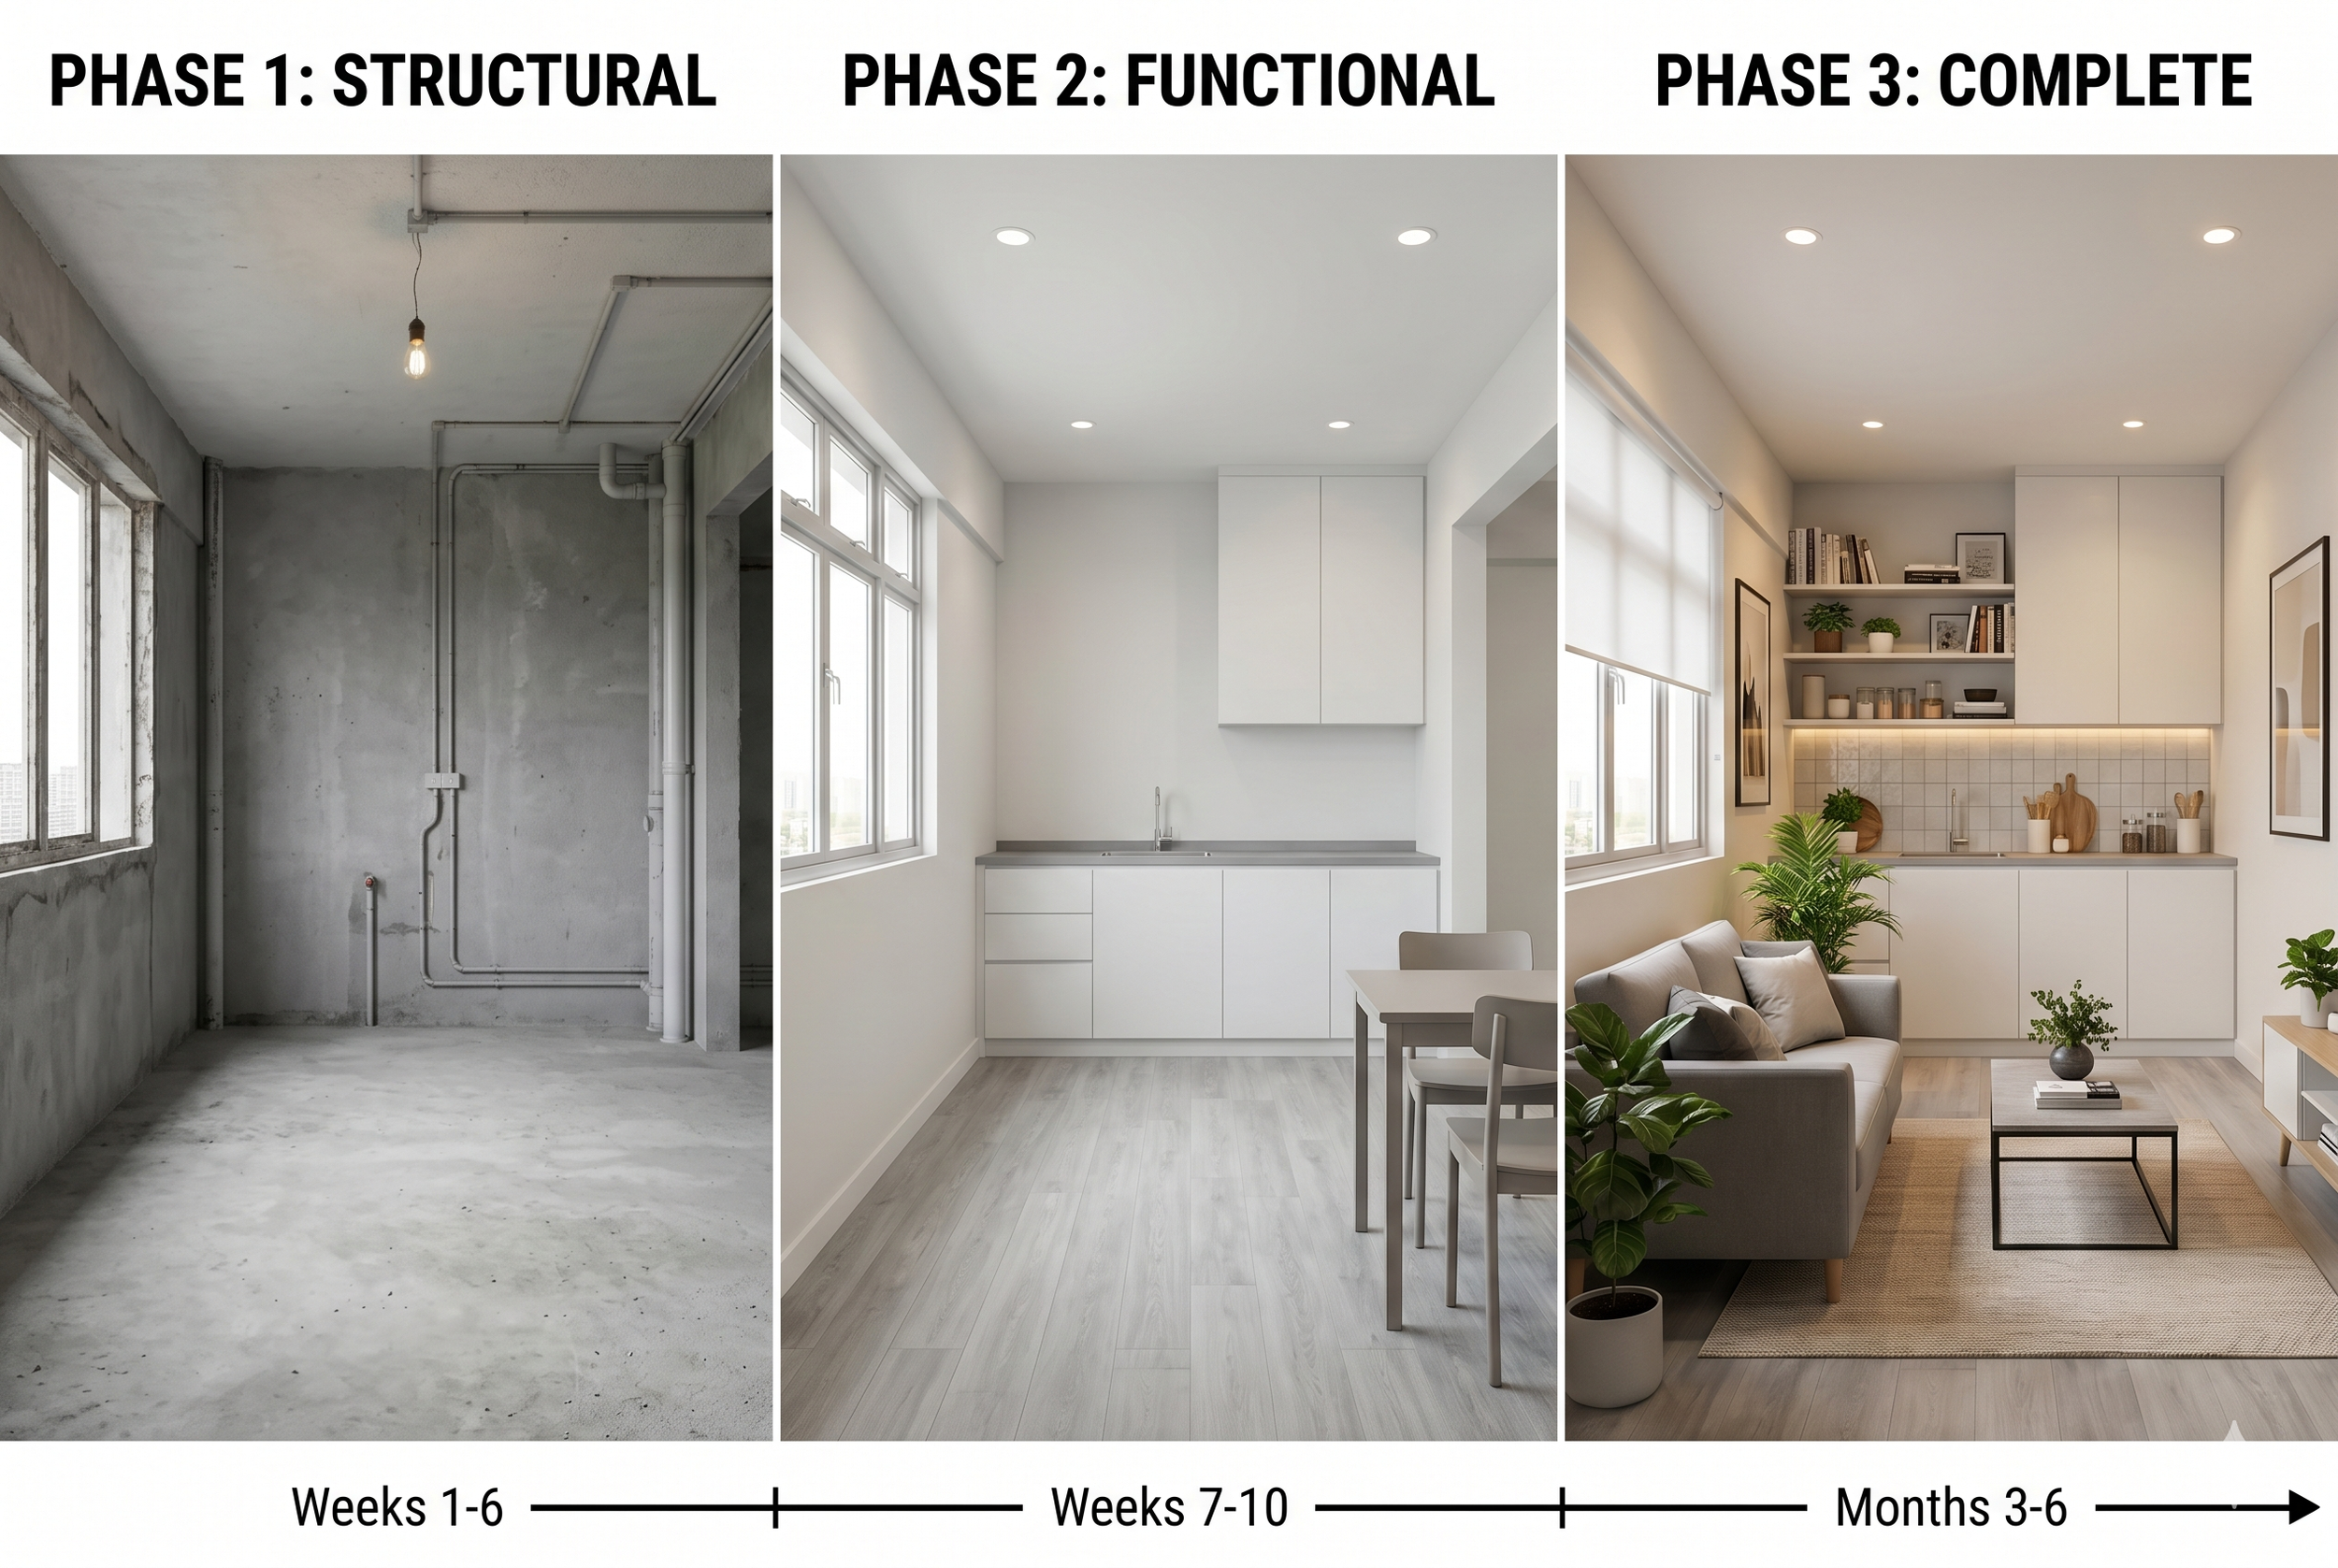
Three-panel image showing HDB flat progression through Phase 1 (structural), Phase 2 (functional), and Phase 3 (finished) renovation stages
Strategy #6: Understand HDB Rules to Avoid Costly Mistakes
One of the most expensive renovation mistakes isn't about choosing the wrong tile—it's about doing work that doesn't comply with HDB regulations and having to redo it.
Common HDB violations that trigger rework (and cost):
Removing structural walls without approval (immediate notice to halt work, structural assessment costs, reinstatement costs)
Improper waterproofing in wet areas (water seepage complaints, rework mandatory)
Unpermitted electrical or plumbing changes (rework, potential fines, HDB inspection failures)
Unauthorized external changes (air-con placement, window modifications)
Exceeding noise restrictions (complaints, work stoppages)
Each of these can add $3,000–$15,000 in unexpected costs and 2–6 weeks of delay.
HDB compliance basics:
Get a renovation permit — Your contractor should handle this, but verify they submitted it. Most major works (hacking, tiling, plumbing) require prior HDB approval.
Use only HDB-licensed contractors — This alone eliminates most compliance issues because licensed contractors know the rules.
Keep waterproofing standards high — In bathrooms and wet areas, HDB requires proper waterproofing membranes and sloped floors. Cutting corners here guarantees problems.
Respect noise restrictions — Renovation hours are 9 AM–5 PM on weekdays only. Noisy work (drilling, hacking) must complete within three consecutive days. Violating this triggers complaints and work stoppages.
Don't alter structural elements — Load-bearing walls, beams, and columns cannot be modified. Open-concept layouts that require wall removal need structural assessments and BCA approval—expensive and complex.
The investment: Spending $500 on HDB consultation or design drawings that ensure compliance saves you from spending $10,000+ on rework later.
Strategy #7: Hire Licensed Contractors (It Saves Money Long-Term)
Your instinct might be to hire an unlicensed contractor offering a 20% discount. Don't. This is a false economy.
Why licensed contractors save you money:
They know HDB rules — Licensed contractors understand regulations because they work with them daily. This means fewer mistakes, fewer compliance issues, fewer costly surprises.
Their work is guaranteed — Licensed contractors carry insurance and are accountable through HDB's RDOC. If something goes wrong, you have recourse. Unlicensed contractors? You have almost none.
Approval process is faster — HDB approves permits faster when they see a licensed contractor's name. Unlicensed contractors often mean delayed permits or outright rejection, which means project delays.
Resale complications are avoided — When you sell your flat later, buyers' lawyers will ask if renovation was done with proper permits. Unlicensed work creates legal and sale complications, potentially costing you tens of thousands in resale value or forced rework.
Quality standards are higher — Licensed contractors have reputations to protect. They use proper materials, follow best practices, and manage timelines professionally.
How to verify: Search HDB's Directory of Renovation Contractors (RDOC) using the contractor's name or registration number. Legitimate contractors are registered.
The real cost: A licensed contractor's 15% premium over an unlicensed quote is cheap insurance against a $10,000 compliance issue, a failed HDB inspection, or a resale complication.
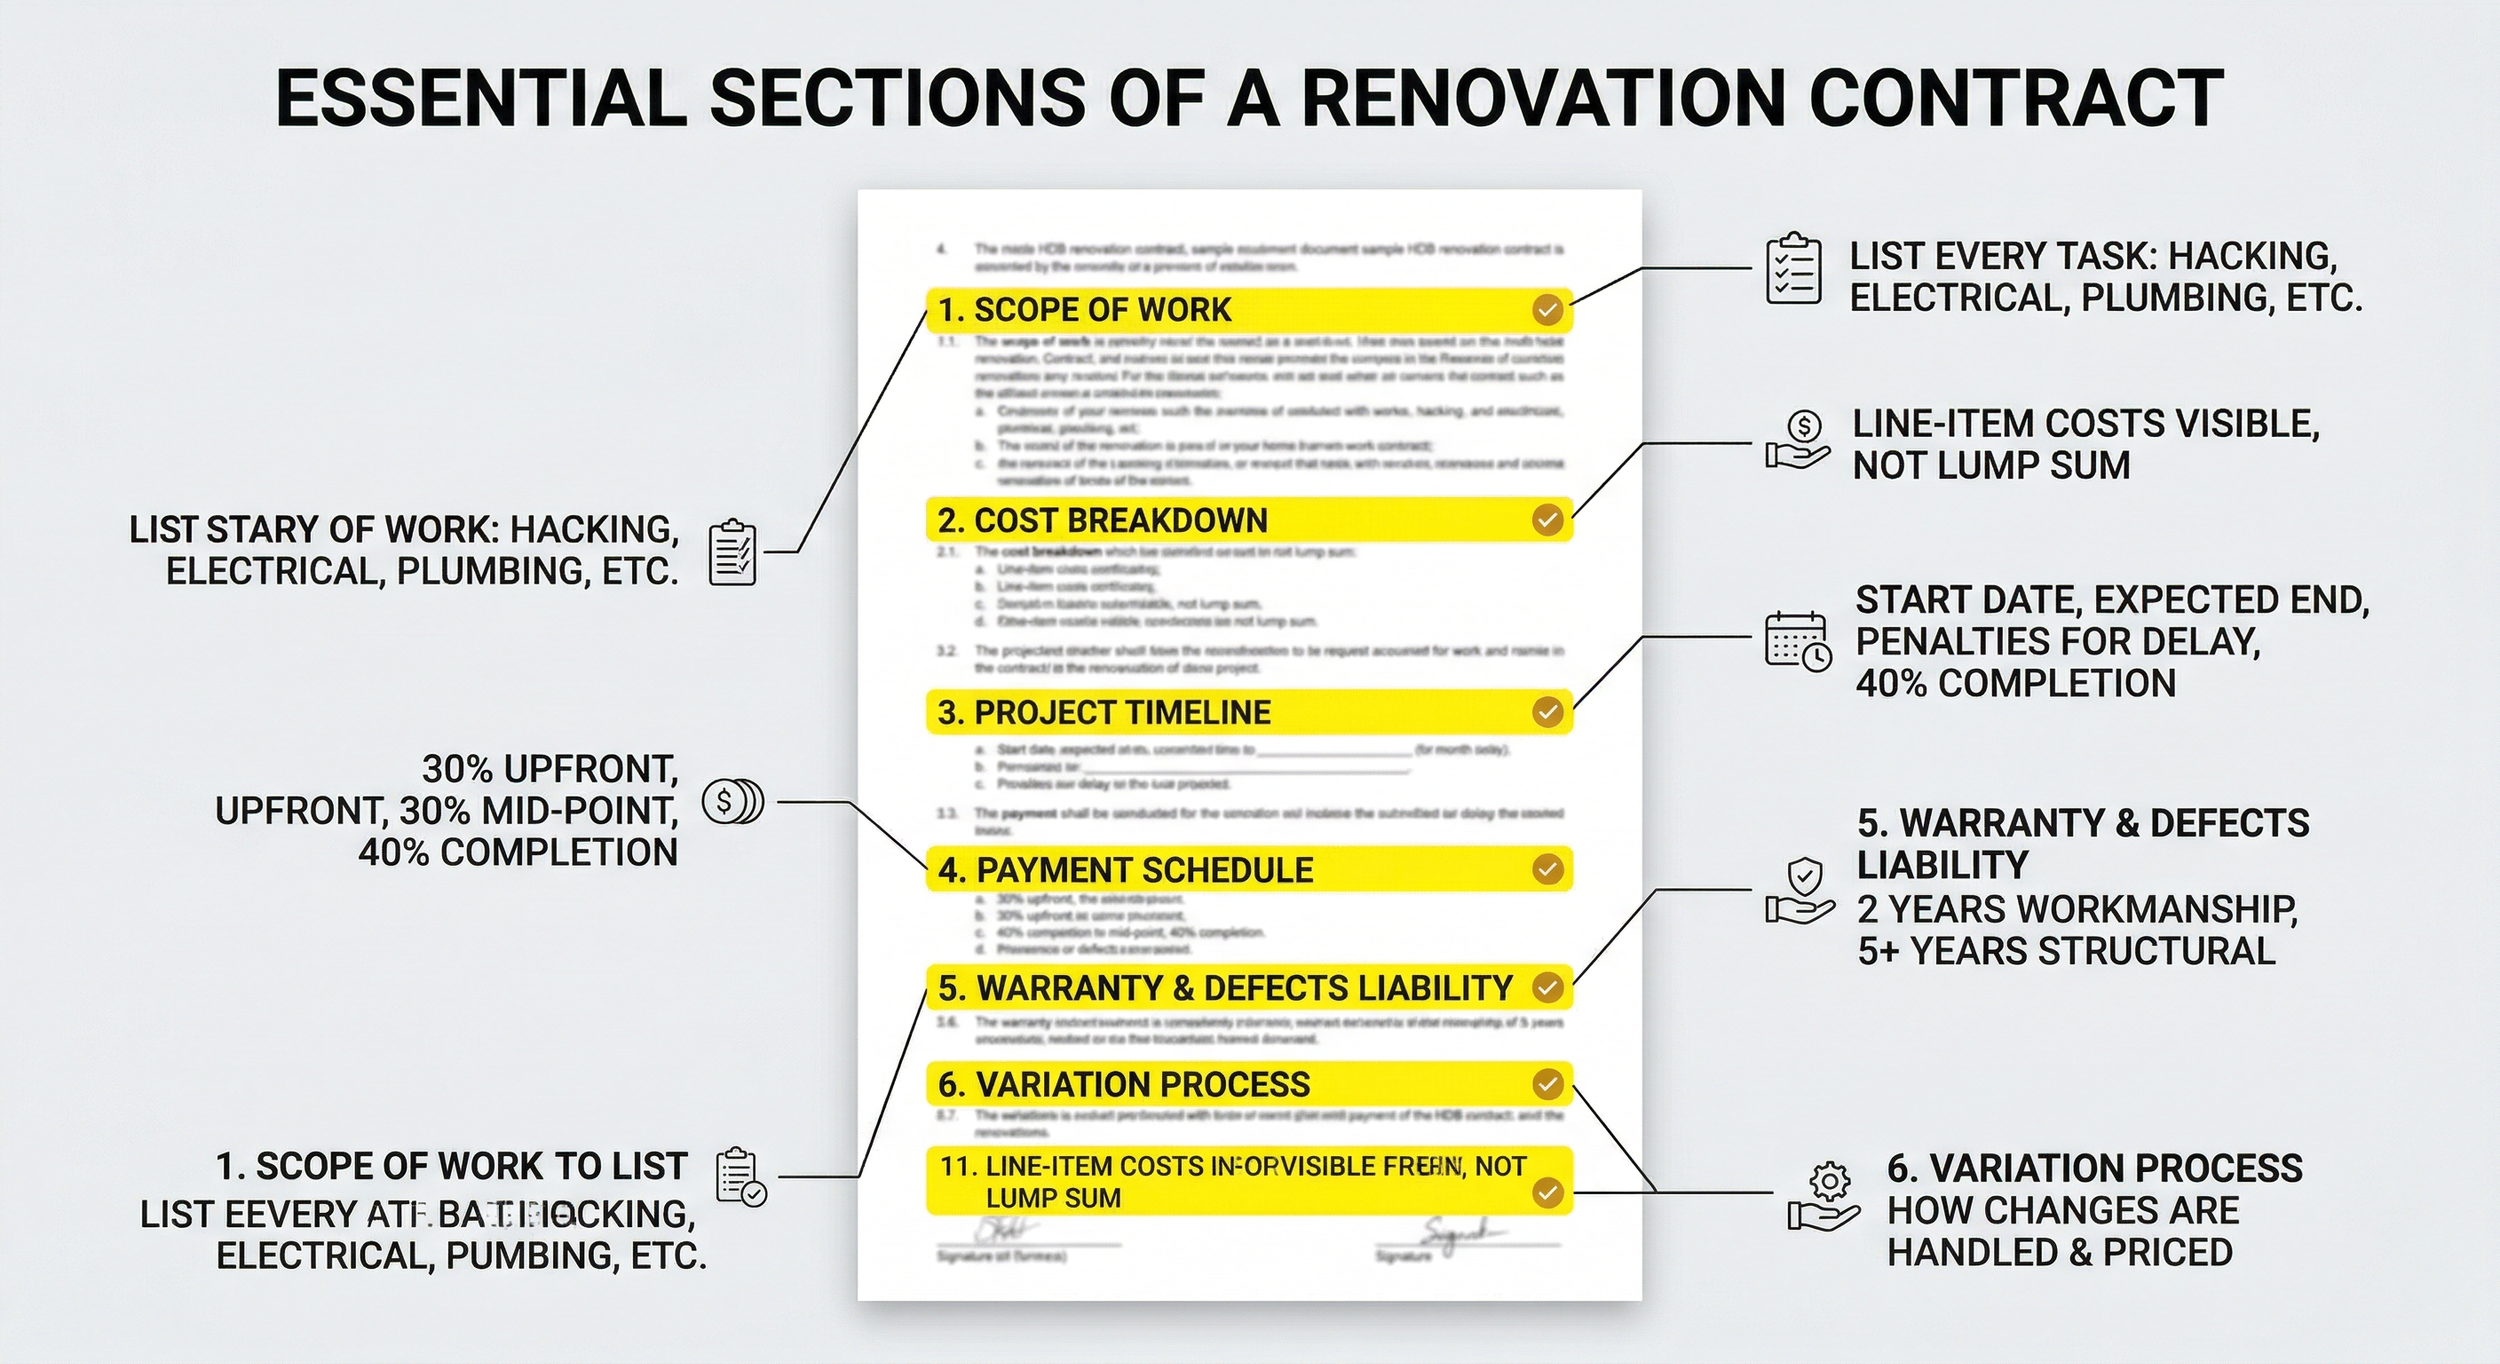
Strategy #8: Get Everything in Writing
Verbal agreements with contractors evaporate fast when issues arise. Written contracts protect you and prevent cost surprises.
Your renovation contract must include:
Scope of work — Itemized list of every task (hacking, tiling, electrical, plumbing, carpentry, painting, etc.).
Materials specification — Types, brands, and quantities of tiles, paint, fixtures, etc. If the contract says "ceramic tiles," and the contractor installs cheaper tiles, you want written proof of what was agreed.
Cost breakdown — Line-by-line costs for each work item, labour, materials, and miscellaneous charges.
Timeline — Start date, expected completion date, and penalties if the contractor significantly exceeds the timeline.
Payment schedule — How much upfront, at milestones, and upon completion. (Standard: 30–40% upfront, 30–40% at midpoint, 20–30% upon completion.)
Variation order process — If additional work is needed (e.g., unexpected hacking, hidden pipes), how is it handled? Price? Timeline? This prevents surprise costs.
Warranty — What's covered if something fails after renovation? (Standard: 2 years on workmanship, 5+ years on structural work.)
Penalty clauses — What happens if the contractor doesn't finish on time? (Standard: $200–500 per day delay.)
A simple written contract prevents the scenario where the contractor says "I quoted $50,000 but the actual work came to $62,000" and you're stuck.
Sample HDB renovation contract with checkmarks highlighting key sections: scope of work, cost breakdown, timeline, warranty
Strategy #9: Use a Renovation Budget Template
The single best tool for controlling costs is a detailed renovation budget template that tracks every category, compares quotes, and monitors spending against estimates.
Essential categories to track:
Pre-renovation
HDB permit fees
Design consultation
3D drawings/renderings
Construction
Hacking and demolition
Carpentry (doors, walls, cabinetry)
Electrical work
Plumbing work
Tiling and flooring
Finishes
Paint
Wall treatments
Fixtures (taps, handles, hinges)
Lighting
Kitchen (if applicable)
Cabinetry
Countertops
Sink and tap
Appliances (extractor hood, stove, oven, microwave)
Bathroom (if applicable)
Cabinetry/vanity
Tiles
Fixtures (taps, toilet, shower)
Mirrors and accessories
Post-renovation
Cleaning
Waste disposal
Touch-ups
Contingency — 10–15% of total (usually $5,000–$10,000)
How to use it:
Enter estimated cost for each item
Enter actual quotes from contractors
Track actual spending as invoices arrive
Update remaining budget monthly
Flag any items that are overrunning
A free renovation budget template helps you see exactly where every dollar goes and catch overspending before it becomes a crisis.
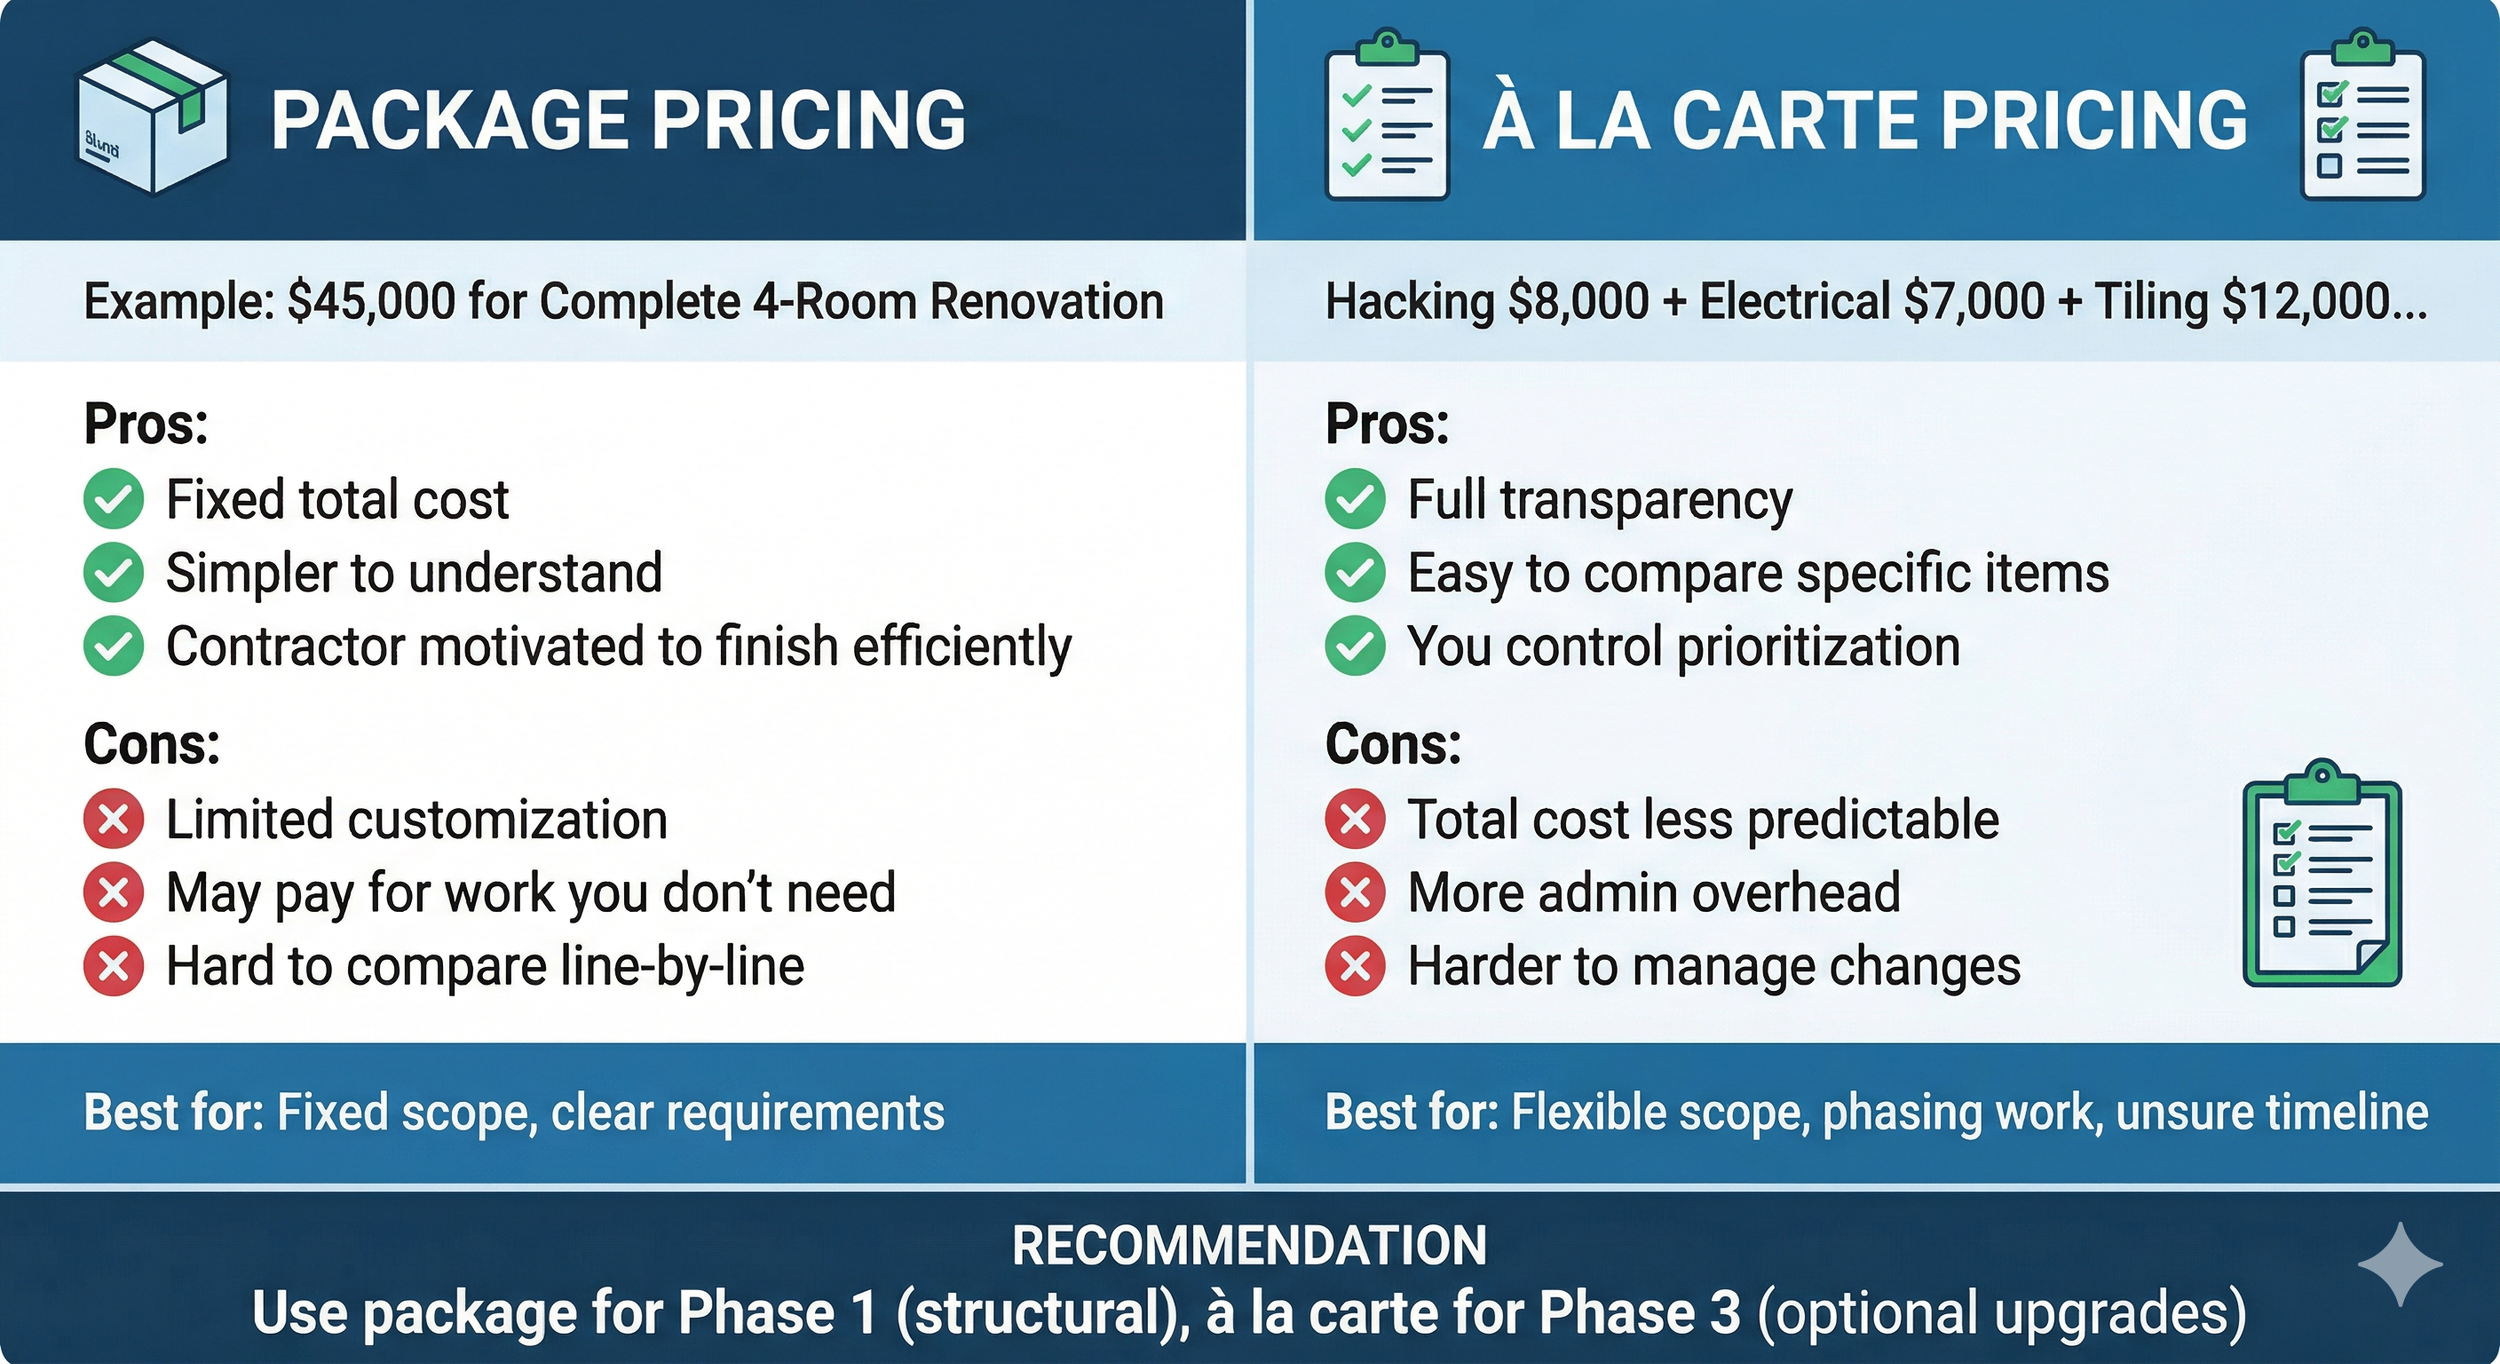
Strategy #10: Understand Package vs. À La Carte Pricing
Some contractors offer "renovation packages" (bundled services at set prices) while others quote à la carte (individual line items). Understanding the difference helps you pick the best option for your budget.
Package pricing (e.g., $45,000 for a 4-room flat):
Pros:
Fixed total cost, easier budgeting
Often includes contingency or variations
Simpler negotiations
Contractor motivation to finish efficiently
Cons:
Limited customization
You might pay for work you don't need
Hard to compare line-by-line with other quotes
À la carte pricing (e.g., hacking $8,000, tiling $12,000, electrical $7,000, etc.):
Pros:
Full transparency on costs
Easy to compare specific items across contractors
You control what gets done and what's deferred
Clear line items to negotiate
Cons:
Total cost less predictable
Changes are harder to manage
More administrative overhead
Which is better for saving money?
If you have a clear, fixed scope of work (e.g., "refresh the kitchen and bathroom, paint the whole flat"), package pricing often saves money because contractors can plan efficiently.
If you're flexible, phasing work, or unsure of exact scope, à la carte pricing is better because you control which line items to prioritize and defer.
Pro tip: Ask contractors if they offer package pricing for essential work (Phase 1: structural + basic finishes) and à la carte for optional upgrades (Phase 3: feature walls, premium finishes). This gives you cost certainty where it matters most.
Comparison chart showing HDB renovation package pricing versus à la carte pricing with pros and cons
Strategy #11: Plan for Furniture and Appliances Separately
This is where homeowners consistently blow their budgets.
You've finished renovation at $48,000, on budget. Then you realize you need a refrigerator ($1,500–$3,500), a stove ($800–$2,000), an extractor hood ($400–$1,200), kitchen storage ($2,000–$5,000), a bed ($1,200–$3,000), and living room furniture ($3,000–$8,000). Suddenly you're at $60,000+ total and wondering how it happened.
Budget correctly:
Appliances (if not included in renovation) — $4,000–$8,000
Extractor hood
Stove/cooktop
Refrigerator
Microwave
Water heater
Kitchen and bedroom storage — $3,000–$6,000
Kitchen cabinets and shelving
Bedroom wardrobes
Bathroom cabinets
Furniture — $5,000–$12,000
Beds and mattresses
Sofa and dining table
Shelving and storage
Soft furnishings and decor — $2,000–$4,000
Curtains, blinds, rugs
Decorative items, artwork
Miscellaneous — $1,000–$2,000
Light switches and outlets
Door handles and hinges
Post-renovation cleaning supplies
The critical shift: Stop thinking of "renovation budget" as your total home investment. Think of it as three separate budgets: renovation ($40,000–$60,000), appliances & furniture ($8,000–$15,000), and decor ($2,000–$5,000).
This prevents the painful realization halfway through that you're "$20,000 over budget" when really you're just entering the next spending phase.
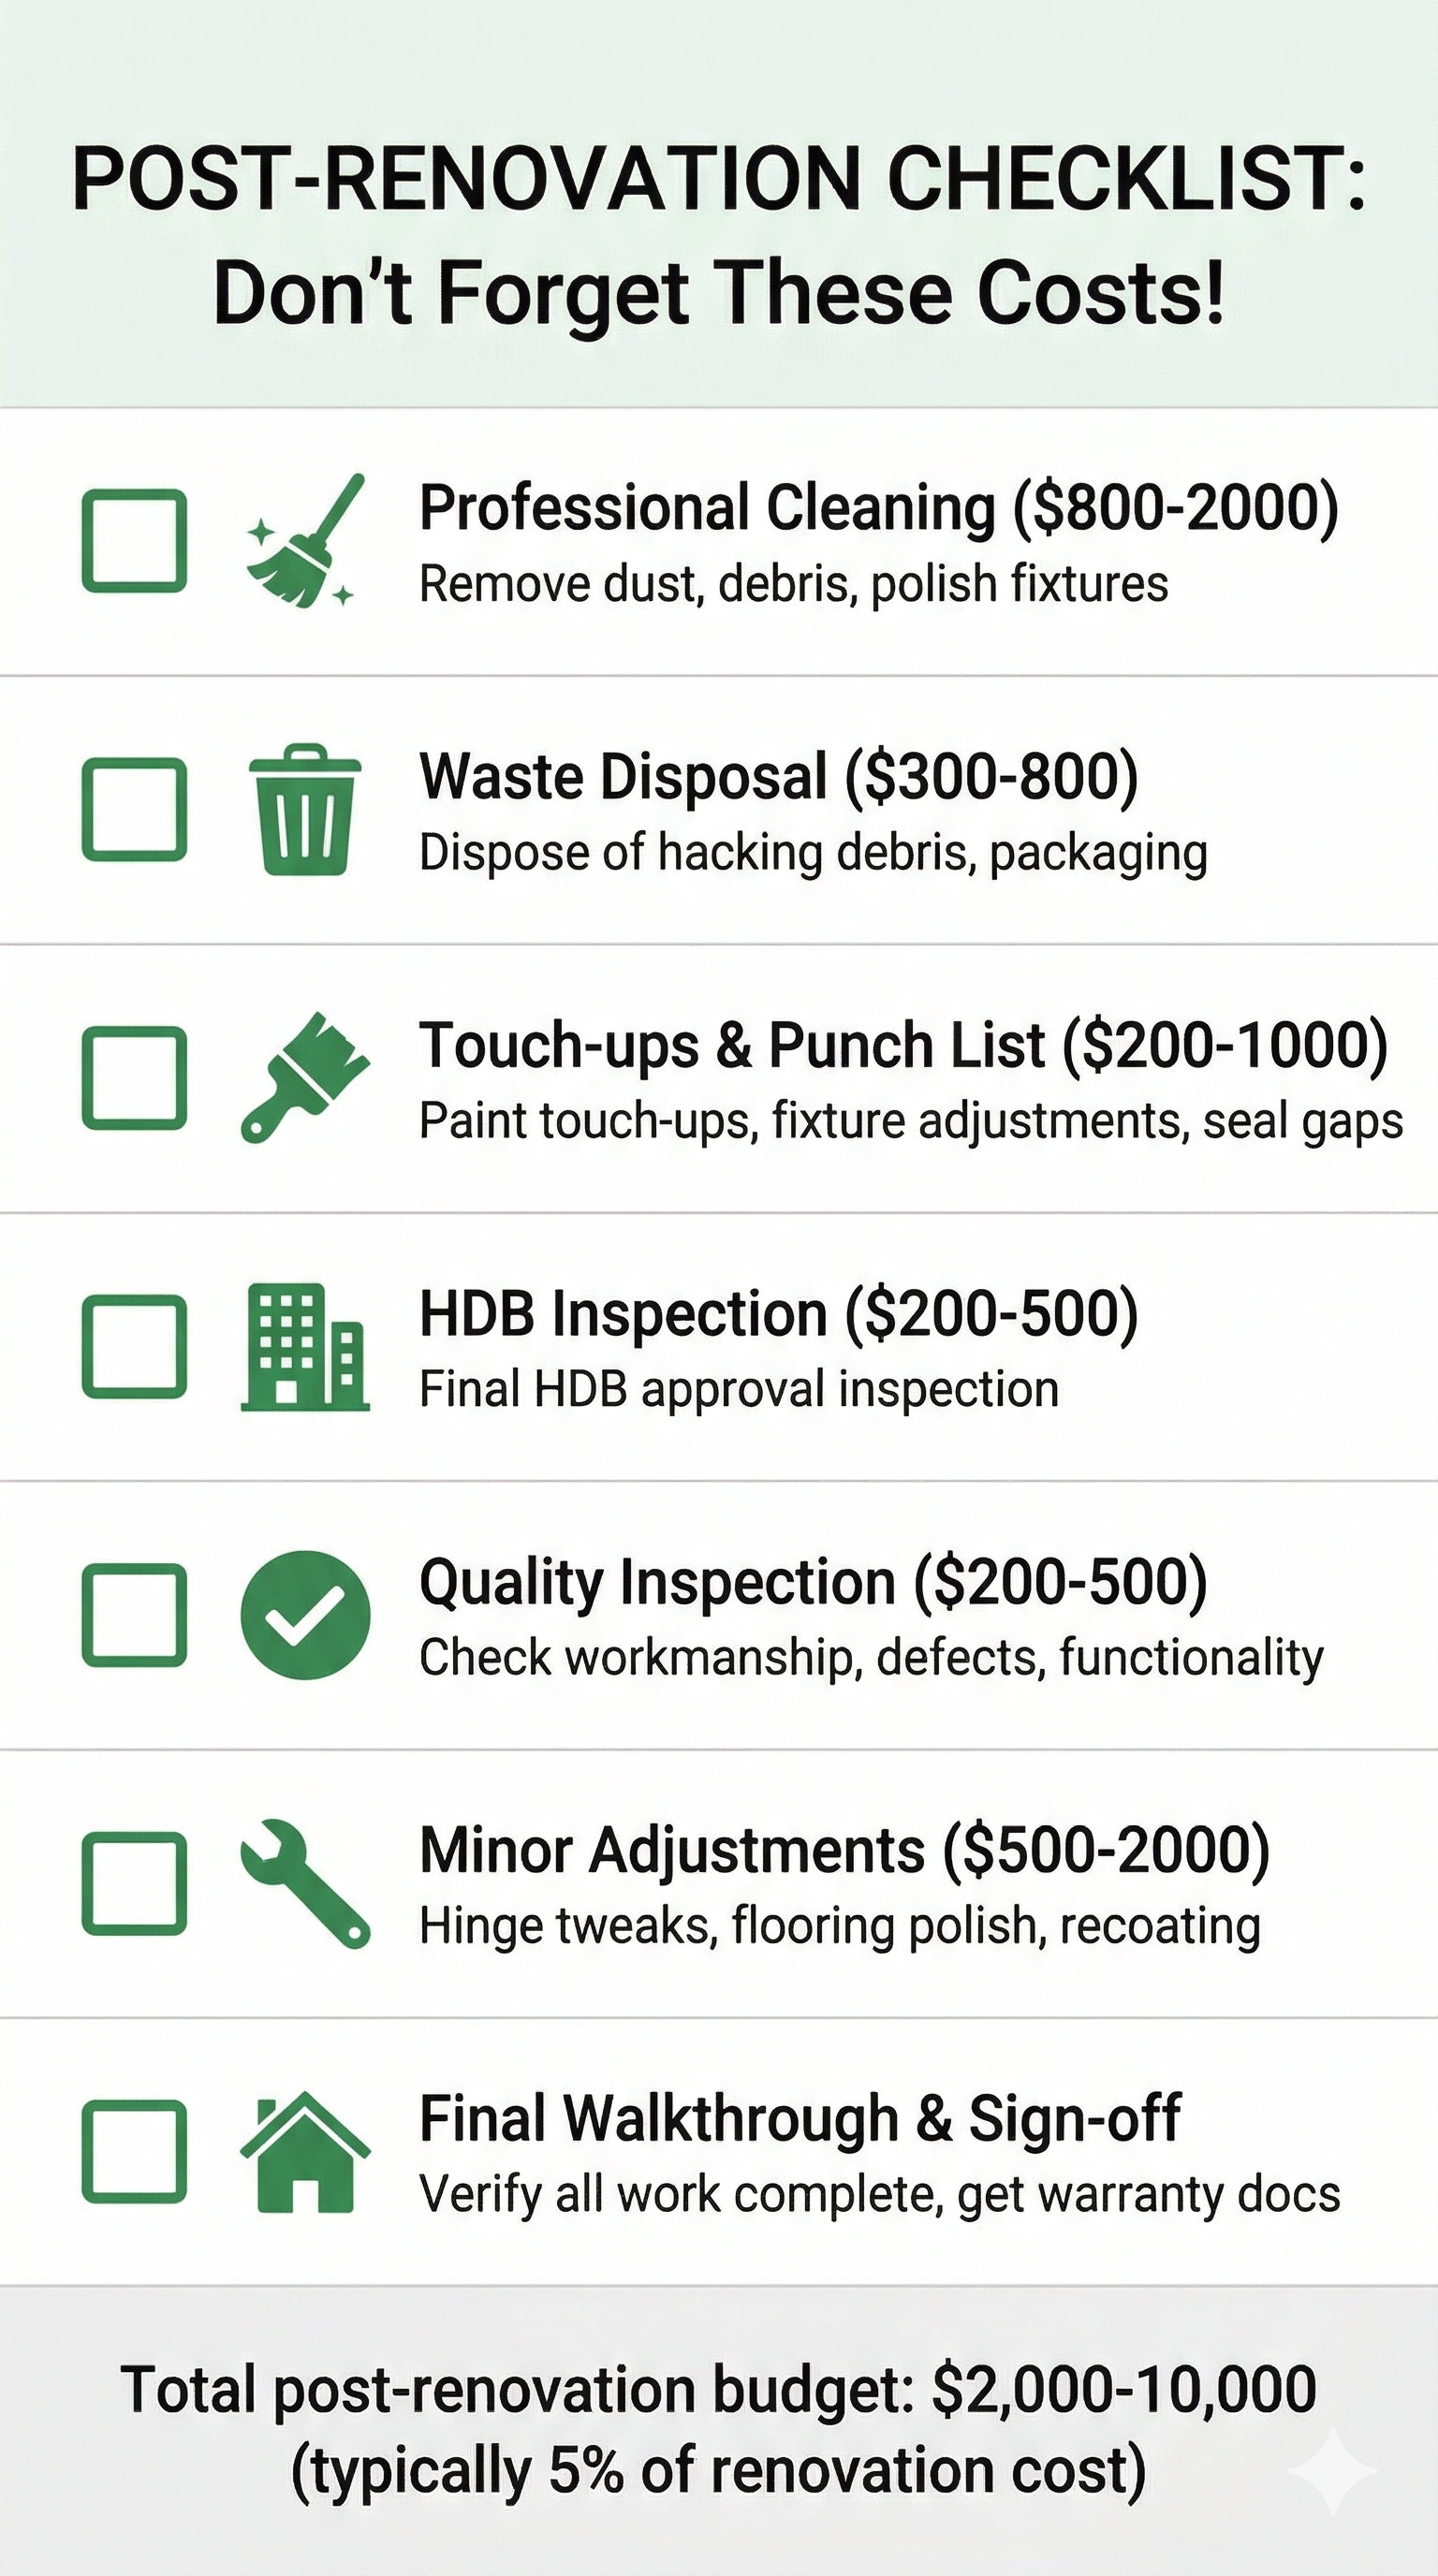
Strategy #12: Plan for Post-Renovation Costs
Renovation doesn't end when the contractor packs up their tools. There are several costs that come after, and homeowners often forget them.
Post-renovation costs to budget:
Cleaning — $800–$2,000 Professional post-renovation cleaning removes dust, debris, and polish from fixtures. DIY is possible but time-consuming.
Waste disposal — $300–$800 Hacking debris, packaging, and old materials need disposal. Some contractors include this; others charge separately.
Touch-ups and punch list items — $200–$1,000 Minor fixes, paint touch-ups, fixture adjustments, sealing gaps.
Approvals and inspections — $200–$500 HDB final inspection, building defects inspection, electrical/plumbing inspection.
Minor repairs and adjustments — $500–$2,000 Hinges that need tweaking, paint that needs recoating, flooring that needs polishing.
Temporary accommodation — $0–$5,000 If you need to stay elsewhere during renovation, factor in hotel or Airbnb costs.
Total post-renovation budget: $2,000–$10,000 (depending on scope)
Most homeowners budget $0 for this and are surprised. Adding 5% to your total renovation budget ($2,000–$3,000) covers most of these costs comfortably.
Checklist infographic of post-renovation tasks including cleaning, inspections, touch-ups, and final walkthroughs
Real-World Budget Example: 4-Room HDB Renovation
Let's walk through a realistic 4-room HDB renovation using these strategies to show how to control costs.
Scenario: Young family buying a resale 4-room HDB. Current kitchen is 20+ years old, bathroom has water seepage, flooring is worn. Budget: $45,000.
Phase 1 (Structural): $25,000 (55%)
HDB permit and design consultation: $800
Hacking, removal, structural work: $6,000
Plumbing (new pipes, routing): $4,000
Electrical work (rewiring, new circuits): $3,500
Carpentry (new door frames, basic walls): $5,000
Waterproofing (bathroom): $2,200
Labour and contingency: $3,500
Phase 2 (Finishes): $13,000 (30%)
Kitchen cabinetry and countertops: $5,000
Bathroom vanity and fixtures: $3,500
Tiling (kitchen, bathroom, hallway): $2,500
Flooring (vinyl/laminate in living areas): $2,000
Phase 3 (Polish): $7,000 (15%)
Painting: $1,200
Lighting fixtures: $1,500
Door hardware and hinges: $500
Feature wall treatment: $1,000
Miscellaneous finishes: $1,800
Total renovation: $45,000 ✓
Not included in renovation budget:
Appliances: $4,000 (budgeted separately)
Furniture: $8,000 (budgeted separately)
Cleaning and waste: $1,500 (post-renovation budget)
Grand total home investment: $58,500
How cost-saving strategies applied:
✓ Prioritized kitchen and bathroom (biggest visual impact)
✓ Got 3 quotes; negotiated contractor rate by 8% ($1,600 saved)
✓ Chose mid-range tiles and vinyl flooring (not budget, not premium)
✓ DIY painting ($600 saved vs. hiring painter)
✓ Phased work to manage cash flow
✓ Used HDB-licensed contractor (avoided compliance rework)
✓ Got written contract with line-item costs
✓ Tracked budget monthly; caught small overruns early
What could have gone wrong without these strategies:
Without phasing: $10,000 cash flow pressure
Without written quotes: Could have ended at $52,000–$55,000
Without contingency: Hit unexpected hacking costs, no buffer
Without licensed contractor: Potential $8,000–$15,000 compliance rework
The reality: This family stayed on budget, moved in comfortably, and had a modern, functional home that reflected their needs.
Common Mistakes That Cost Thousands
Understanding what NOT to do is just as important as knowing what to do.
Mistake #1: Over-customising early Building custom cabinetry, bespoke furniture, or advanced layouts before you've lived in the space is expensive and often regrettable. Standard furniture and cabinetry are 30–50% cheaper, easier to replace, and give you flexibility.
Mistake #2: Skipping the design consultation You might save $500–$1,500 on design consultation, but a good designer prevents $5,000–$10,000 in mistakes (wrong material choices, layout inefficiencies, compliance issues). The consultation ROI is huge.
Mistake #3: Rushing the contractor selection Choosing based on price alone leads to hidden cost overruns, rework, and delays. Spending 2–3 weeks comparing contractors saves 4–8 weeks of project delays later.
Mistake #4: Not getting quotes in writing Verbal quotes become written ones later when the price is higher. Always insist on written, itemized quotes before agreeing.
Mistake #5: Underestimating contingency A 5% contingency is optimistic for HDB work. 10–15% is realistic. Skimping on contingency means you're one surprise away from a budget crisis.
Mistake #6: Deferring critical work to save money Skipping waterproofing, electrical safety checks, or structural assessments to save $2,000 costs $10,000+ to fix later. Never defer critical structural or safety work.
Mistake #7: Comparing quotes without understanding scope If one contractor quotes $40,000 and another $48,000, ask why. Different scope, different materials, different labour costs? Lowest quote isn't always best.
The Bottom Line: Smart Planning Saves Thousands
Saving money on HDB renovations isn't about cutting corners. It's about making intentional choices, planning thoroughly, and knowing the difference between genuine cost-saving and false economy.
The homeowners who stay on budget and love their renovation outcomes share these habits:
They prioritise high-impact upgrades and defer nice-to-haves
They get multiple quotes and negotiate thoughtfully
They track spending against budget monthly
They work with licensed contractors and get everything in writing
They build in contingency for the unexpected
They phase work to manage cash flow
If you apply just 3–4 of these strategies, you'll likely save $5,000–$10,000 on your HDB renovation costs and avoid the regrets that come from rushed, unplanned projects.
Ready to plan your renovation with confidence? A professional interior designer can help you prioritize, plan, and stay on budget. At TBC Design Studio, we work with HDB owners across all flat types to create beautiful, functional homes that won't break the bank. Book a free consultation to discuss your project and budget.
FAQs: Saving Money on HDB Renovations
Q: How much should I budget as contingency for an HDB renovation? A: 10–15% of your total renovation cost. For a $45,000 renovation, that's $4,500–$6,750. This buffer covers unexpected hacking, hidden pipes, or structural surprises that always seem to arise.
Q: Is it cheaper to hire a designer or DIY my renovation design? A: A professional designer typically costs $800–$2,500 but prevents $5,000–$15,000 in costly mistakes (layout inefficiencies, wrong material choices, compliance issues). ROI is almost always positive. DIY design saves money upfront but often costs more later.
Q: Should I use a contractor's package or get à la carte quotes? A: It depends on your scope and flexibility. Packages work if you have a fixed, non-negotiable scope. À la carte works if you're phasing work or want to customize every line item. Get quotes both ways and compare.
Q: Can I save money by using non-licensed contractors? A: Not really. While they quote 10–20% lower, they often lead to compliance rework ($8,000–$15,000), resale complications, or HDB approval delays. The "savings" disappear fast. Use licensed contractors from HDB's RDOC.
Q: What costs do most homeowners forget to budget for? A: Appliances, furniture, post-renovation cleaning, waste disposal, and contingency. These often add 20–40% to the renovation cost. Budget for them separately.
Q: How can I reduce my renovation timeline to save on costs? A: Shorter timelines reduce daily labour costs and contractor overhead. However, rushing often leads to mistakes. Work with your contractor to identify efficiency gains (ordering materials early, phasing non-critical work) without sacrificing quality.